
Replacing Your Garage Door Spring
- COMMERCIAL GARAGE DOOR REPAIR
- GARAGE DOOR OPENER INSTALLATION
- GARAGE DOOR SPRING REPAIR
- SAME-DAY GARAGE DOOR REPAIR
- CUSTOM GARAGE DOOR
- GARAGE DOOR OPENER REPAIR
- GARAGE DOOR TRACK REPAIR
- GARAGE DOOR CABLE REPAIR
- GARAGE DOOR PANEL REPAIR
- LOCAL GARAGE DOOR REPAIR
- GARAGE DOOR REPLACEMENT
- NOISY GARAGE DOOR FIX
- GARAGE DOOR INSTALLATION
- GARAGE DOOR SECTION REPLACEMENT
- OVERHEAD GARAGE DOOR REPAIR
- GATE REPAIR
Replacing Your Garage Door Spring: A Step-by-Step Guide
Garage door springs might be one of the most overlooked parts of home maintenance, but they do the heavy lifting—literally! They play a crucial role in ensuring your garage door opens and closes smoothly. When a spring breaks or begins to wear out, it’s essential to address the issue quickly. However, replacing a garage door spring can be risky due to the high tension these springs hold. This guide will walk you through the process while emphasizing safety every step of the way.
Understanding Garage Door Springs
Types of Garage Door Springs
There are two main types of garage door springs to know about before getting started:
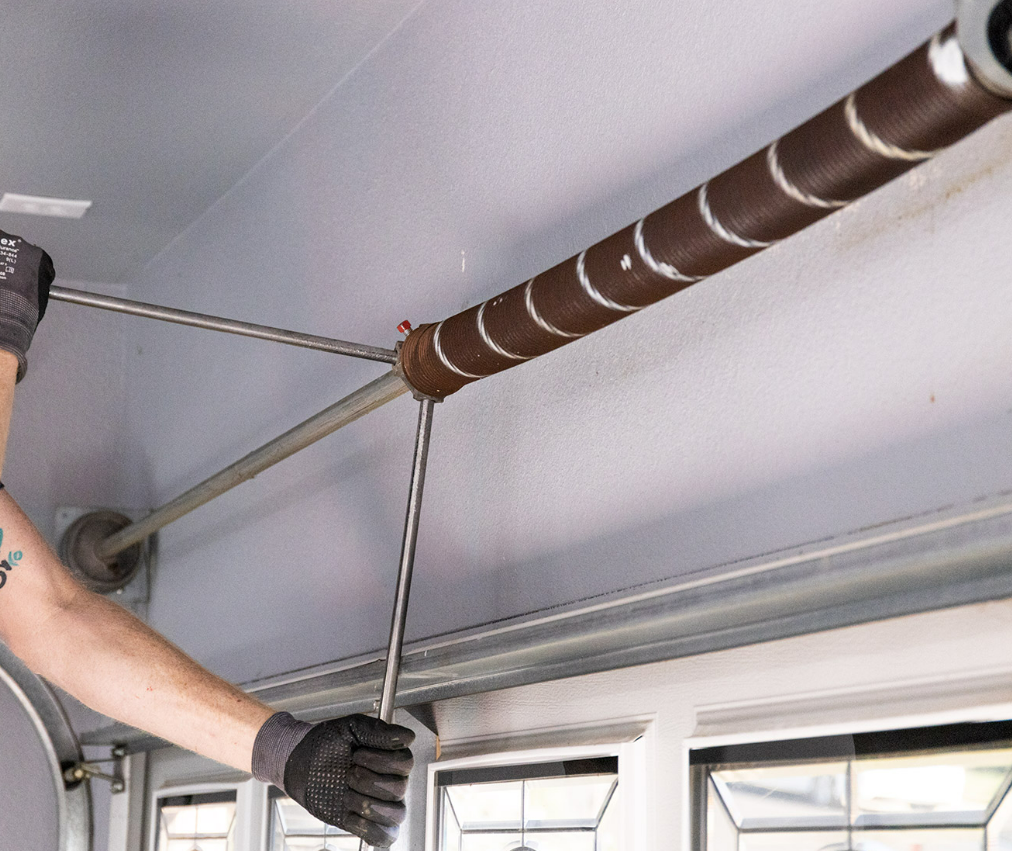
- Torsion Springs
Typically mounted above the garage door, torsion springs are wound tightly and release energy to lift the door. They are more durable and often last longer than extension springs.
- Extension Springs
Located on either side of the door, these springs stretch as the door opens and contract as it closes. They are common in smaller or older garage doors.
Identifying the Right Replacement
Not all springs are created equal, so finding the right match for your door is critical. Here’s what to check for:
- Measure Length, Diameter & Wire Size
Use a tape measure to accurately determine spring length and diameter. You’ll also need to measure the wire size, which ensures the proper tension.
- Check the Color Code
Many springs come with a color-coding system to help identify their tension rating. This makes finding a compatible replacement much easier.
Tools You’ll Need
Before beginning, gather the right tools for the job:
- Safety glasses and gloves
- Winding bars
- Adjustable wrenches
- Socket set
- Ladder
Step-by-Step Replacement Guide
Safety First: Releasing Tension
Garage door springs are under significant tension, making this step critical.
- Disconnect the garage door opener to prevent accidental movement.
- Secure the door in the closed position with a heavy-duty clamp.
- Use winding bars to slowly unwind the torsion spring. Maintain a steady hand and ensure a firm grip to avoid accidents.
Removing the Old Spring
- Once the tension is safely released, detach the spring from its mounting brackets.
- Carefully remove the spring from the torsion bar or extension cables.
- If there’s rust or stubborn components, use a rust penetrant to loosen them.
Installing the New Spring
- Position the new spring in place and attach it to the mounting brackets.
- Use winding bars to correctly wind the torsion spring or connect the extension spring. Refer to the manufacturer’s guide for the exact number of turns or stretches.
- Test the door’s balance by opening it halfway—if it stays in place, the replacement was successful.
Keep Your Garage Door Running Smoothly
Replacing a garage door spring may sound intimidating, but with the right tools and steps, it’s manageable. That said, your safety is non-negotiable. Regular maintenance, such as lubricating moving parts and checking for wear, is key to prolonging your spring’s lifespan.
Not feeling confident? No problem. For expert assistance and hassle-free service, contact Garage Door Repair Sun City Center Florida today. Whether it’s spring replacements or any other garage door issue, we’ve got your back!